Tutorial
Android Interview Questions And Answers

While we believe that this content benefits our community, we have not yet thoroughly reviewed it. If you have any suggestions for improvements, please let us know by clicking the “report an issue“ button at the bottom of the tutorial.
Android is the most popular operating system for mobile phone. Android apps are very popular these days. Since Android is open source, it’s very popular and anyone can create android apps. There are many companies working solely to create android apps. I have written a lot on Android tutorials, here I am listing some of the important android interview questions to help you in the interview.
Android Interview Questions

-
What is the difference between Activity and AppCompatActivity?
AppCompatActivity provides native ActionBar support that is consistent across the application. Also, it provides backward compatibility for other material design components till SDK version 7(ActionBar was natively available since SDK 11). Extending an Activity doesn’t provide any of these. Note: Since SDK 21 every activity by default, extends AppCompatActivity.
-
Activity, AppCompatActivity, FragmentActivity and ActionBarActivity. How are they related?
Activity is the base class. FragmentActivity extends Activity. AppCompatActivity extends FragmentActivity. ActionBarActivity extends AppCompatActivity. FragmentActivity is used for fragments. Since the build version 22.1.0 of the support library, ActionBarActivity is deprecated. It was the base class of
appcompat-v7. At present, AppCompatActivity is the base class of the support library. It has come up with many new features like ToolBar, tinted widgets, material design color pallets etc. -
What is Android Support Library and why is it recommended?
The android platform supports a wide variety of the versions and devices to choose from. With the release of every new version, new Android APIs are added and evolved. To make these new Android APIs available to users on older devices the Android Support Library was designed. Android Support Library provides developers with newer APIs that are compatible on older framework releases.
-
Describe the structure of Android Support Library?
Android Support Library is not just a single library. It’s a collection of libraries that have different naming conventions and usages. On a higher level, it’s divided into three types;
- Compatibility Libraries: These focus on back porting features so that older frameworks can take advantage of newer releases. The major libraries include
v4andv7-appcompat. v4 includes classes like DrawerLayout and ViewPager while appcompat-v7 provides classes for support ActionBar and ToolBar. - Component Libraries: These include libraries of certain modules that don’t depend on other support library dependencies. They can be easily added or removed. Examples include
v7-recyclerviewandv7-cardview. - Miscellaneous libraries: The Android support libraries consists of few other libraries such as
v8which provides support for RenderScript,annotationsfor supporting annotations like @NonNull.
- Compatibility Libraries: These focus on back porting features so that older frameworks can take advantage of newer releases. The major libraries include
-
Name the seven important lifecycle methods of an Activity.
- onCreate()
- onStart()
- onResume()
- onPause()
- onStop()
- onDestroy()
- onRestart()

-
Differentiate between
onCreate(),onStart(),onResume(),onDestroy(),onStop(),onPause(). When are they called during the lifecycle of an Activity?onCreate() is the first method that’s invoked when an activity is launched for the first time. onStart() is invoked after onCreate() has completed it’s task. onResume() is called after onStart() has completed. When an activity leaves its foreground (probably for a smaller duration such as standby/sleep) onPause() is invoked followed by onStop()(when the activity is not visible. eg. some other application is launched). onDestroy() is called when the activity or application is killed. Essentially the lifecycle methods are divided into three layers of duration :
- onCreate() and onDestroy() are present during the entire duration of the activity
- onStart() and onStop() are present while the activity is visible
- onResume() and onPause() are present while the activity is in foreground
-
Pressing the home button from an application invokes onPause() and onStop(). Describe a scenario where only the onPause() gets invoked.
Create and launch a new activity which obscures the current activity partially. This can be done by defining the layout_width and layout_height to partially cover the screen. This would keep the first activity visible but not in the foreground. Example: define the layout_width and layout_height as 200dp each.
-
How does the activity respond when the user rotates the screen?
When the screen is rotated, the current instance of the activity is destroyed a new instance of the Activity is created in the new orientation. The onRestart() method is invoked first when a screen is rotated. The other lifecycle methods get invoked in the similar flow as they were when the activity was first created.
-
Given below is a sample layout of the activity_main.xml
<?xml version="1.0" encoding="utf-8"?>
<RelativeLayout xmlns:android="https://schemas.android.com/apk/res/android"
 android:layout_width="match_parent"
 android:layout_height="match_parent"
 android:paddingBottom="@dimen/activity_vertical_margin"
 android:paddingLeft="@dimen/activity_horizontal_margin"
 android:paddingRight="@dimen/activity_horizontal_margin"
 android:paddingTop="@dimen/activity_vertical_margin"
 >

 <TextView
 android:layout_width="wrap_content"
 android:layout_height="wrap_content"
 android:text="0"
 android:id="@+id/textView"
 android:layout_alignParentRight="true"
 android:layout_alignParentEnd="true"
 android:layout_alignParentLeft="true"
 android:layout_alignParentStart="true" />

 <Button
 android:layout_width="wrap_content"
 android:layout_height="wrap_content"
 android:text="Increment"
 android:id="@+id/button"
 android:layout_centerVertical="true"
 android:layout_centerHorizontal="true" />
</RelativeLayout>
Given below is a sample MainActivity.java class;
public class MainActivity extends AppCompatActivity {
    Button increment;
    TextView textView;
    int i=0;

    @Override
    protected void onCreate(Bundle savedInstanceState) {
        super.onCreate(savedInstanceState);
        setContentView(R.layout.activity_main);

        increment=(Button)findViewById(R.id.button);
        textView=(TextView)findViewById(R.id.textView);

        increment.setOnClickListener(new View.OnClickListener() {
            @Override
            public void onClick(View v) {

                i++;
                textView.setText(i);
            }
        });

    }

}
The above application is designed to increment the textview value by 1 every time the button is clicked but it will crash. Why?
The application will crash with a
android.content.res.Resources$NotFoundException: String resource ID #0x1exception since the textview expects a string value. The above code is passing the integer directly. We need to convert it into a string. This can be done in either of two ways:textView.setText(""+i);textView.setText(String.valueOf(i));
-
This is a follow up question to the case above. How does the above application respond when the screen orientation is changed?
On-screen rotation the activity restarts and the objects are initialized again. Hence the textView counter resets to zero every time the orientation is changed.
The most basic approach is to add an element attribute tag `android:configChanges` inside the activity tag in the AndroidManifest.xml as shown below.

```
<activity android:name=".MainActivity"
	 android:configChanges="orientation|screenSize">

	<intent-filter>
	  	 <action android:name="android.intent.action.MAIN" />
	  	 <category android:name="android.intent.category.LAUNCHER" />
    </intent-filter>

</activity>
```

In general, the configChanges for any activity are defined as

```
android:configChanges="orientation|screenSize|keyboardHidden"
```

The `keyboardHidden` configuration is to prevent the keyboard from resetting if it's pulled out.
- An example layout of activity_main.xml is given below. The MainActivity.java only contains the blank onCreate() method.
```
<?xml version="1.0" encoding="utf-8"?>
<RelativeLayout xmlns:android="https://schemas.android.com/apk/res/android"
	android:layout_width="match_parent"
	android:layout_height="match_parent"
	android:paddingBottom="@dimen/activity_vertical_margin"
 	android:paddingLeft="@dimen/activity_horizontal_margin"
 	android:paddingRight="@dimen/activity_horizontal_margin"
 	android:paddingTop="@dimen/activity_vertical_margin"
>

  <EditText
 	android:layout_width="wrap_content"
 	android:layout_height="wrap_content"
 	android:text="Hello World!"
 	android:layout_alignParentRight="true"
 	android:layout_alignParentEnd="true"
 	android:layout_alignParentLeft="true"
 	android:layout_alignParentStart="true" />

</RelativeLayout>
```

The configChanges are defined in the AndroidManifest.xml as `android:configChanges="orientation|screenSize|keyboardHidden"`

#### Does the input text entered in the EditText persist when the orientation is changed? Yes/No? Explain.

No. Despite the configChanges defined in the AndroidManifest.xml, the EditText input text entered resets when the orientation is changed. This is because no resource id has been defined. On orientation change, the instance of the EditText gets lost. To fix this issue to work correctly add an `android:id` attribute element in the EditText tag.
`android:configChanges` is not the recommended way by Google. Though it's the simplest way to use, it comes with its own share of drawbacks. First, the common perception that android:configChanges = "orientation" will magically retain the data is a complete misinterpretation. The orientation changes can occur from a number of other events such as changing the default language can trigger a configuration change and destroy and recreate the activity. Second, the activity can restart itself if it's in the background and Android decides to free up its heap memory by killing it. When the application returns to the foreground it'll restart it's data to the original state and the user may not like that. A better alternative of `android:configChanges` is; Saving the current state of the activity when it's being destroyed and restoring the valuable data when it's restarted can be done by overriding the methods `onSaveInstanceState()` and `onRestoreInstanceState()` of the activity class.
In general the onSaveInstanceState() is invoked after onPause() and before the onStop(). But the API documentation explicitly states that the onSaveInstanceState( ) method will be called before onStop() but makes no guarantees it will be called before or after onPause(). The onRestoreInstanceState() is called after onStart() is invoked. The onRestoreInstanceState() method is invoked only when the activity was killed before. If the activity is NOT killed the onSaveInstanceState() is NOT called. When the activity is being destroyed, the onSaveInstanceState() gets invoked. The onSaveInstanceState contains a Bundle parameter. The data to be saved is stored in the bundle object in the form of a HashMap. The bundle object is like a custom HashMap object. The data is retrieved in the onRestoreInstanceState() method using the keys.
-
You’ve been given a layout that contains an EditText field. Implement the onSaveInstanceState() and onRestoreInstanceState() to save and restore the current input text when the screen is rotated without declaring the android:configChanges attribute in the manifest file. The MainActivity.java is given below.
```

public class MainActivity extends AppCompatActivity {
    EditText editText;
    @Override
    protected void onCreate(Bundle savedInstanceState) {
        super.onCreate(savedInstanceState);
        setContentView(R.layout.activity_main);

        editText = (EditText) findViewById(R.id.editText);
    }
}
```

```

public class MainActivity extends AppCompatActivity {
    EditText editText;
    @Override
    protected void onCreate(Bundle savedInstanceState) {
        super.onCreate(savedInstanceState);
        setContentView(R.layout.activity_main);
        editText = (EditText) findViewById(R.id.editText);
    }
    @Override
    public void onSaveInstanceState(Bundle outState) {
        super.onSaveInstanceState(outState);
        outState.putString("myData", editText.getText().toString());
    }
    @Override
    protected void onRestoreInstanceState(Bundle savedInstanceState) {
        super.onRestoreInstanceState(savedInstanceState);
        editText.setText(savedInstanceState.getString("myData"));
    }
}
```
The screen orientation can be fixed by adding the attribute `android:screenOrientation="portrait"` or `android:screenOrientation="landscape"` in the activity tag. To keep the screen always on for a particular screen add the `android:keepScreenOn="true"` in the root tag of the activity layout.
Given below is the MainActivity.java class

```

public class MainActivity extends AppCompatActivity {
    Button btn;
    @Override
    protected void onCreate(Bundle savedInstanceState) {
        super.onCreate(savedInstanceState);
        setContentView(R.layout.activity_main);

        btn = (Button) findViewById(R.id.btn);

        btn.setOnClickListener(new View.OnClickListener() {
            @Override
            public void onClick(View v) {

                restartActivity();

            }
        });
    }

    public void restartActivity() {
        //Complete the code
    }

}
```

We need to invoke the recreate method on the Activity instance as shown below.

```
public void restartActivity() {
        MainActivity.this.recreate();
    }
```
Android Intents are used to
1.  start an activity - startActivity(intent)
2.  start a service - startService(intent)
3.  deliver a broadcast - sendBroadcast(intent)
To enable calling from the application we need to add the following permission in the manifest tag of AndroidManifest.xml

```
<uses-permission android:name="android.permission.CALL_PHONE" />
```

In the MainActivity the following code invokes an action call to the given number represented as a string. The string is parsed as a URI.

```

String phone_number = "XXXXXXX" // replace it with the number

Intent intent=new Intent(Intent.ACTION_CALL,Uri.parse("tel:"+phone number);
startActivity(intent);
```

To open a URL we need to add the following permission.

```
<uses-permission android:name="android.permission.INTERNET" />
```

The intent to view a URL is defined below.

```
Intent intent = new Intent(Intent.ACTION_VIEW, Uri.parse("https://www.journaldev.com/"));
startActivity(intent);
```
When we're using setFlags, we're replacing the old flags with a new set of Flags. When we use addFlags, we're appending more flags.
The first approach is to use a `FLAG_ACTIVITY_CLEAR_TOP` flag.

```
Intent intent= new Intent(ActivityA.this, ActivityB.class);
intent.setFlags(Intent.FLAG_ACTIVITY_CLEAR_TOP);
startActivity(intent);
finish();
```

The second way is by using `FLAG_ACTIVITY_CLEAR_TASK` and `FLAG_ACTIVITY_NEW_TASK` in conjunction.

```
Intent intent= new Intent(ActivityA.this, ActivityB.class);
intent.setFlags(Intent.FLAG_ACTIVITY_NEW_TASK | Intent.FLAG_ACTIVITY_CLEAR_TASK);
startActivity(intent);
```
`FLAG_ACTIVITY_CLEAR_TASK` is used to clear all the activities from the task including any existing instances of the class invoked. The Activity launched by intent becomes the new root of the otherwise empty task list. This flag has to be used in conjunction with `FLAG_ ACTIVITY_NEW_TASK`. `FLAG_ACTIVITY_CLEAR_TOP` on the other hand, if set and if an old instance of this Activity exists in the task list then barring that all the other activities are removed and that old activity becomes the root of the task list. Else if there's no instance of that activity then a new instance of it is made the root of the task list. Using `FLAG_ACTIVITY_NEW_TASK` in conjunction is a good practice, though not necessary.
When we're trying to launch an activity from outside the activity's context, a FLAG\_ACTIVITY\_NEW\_TASK is compulsory else a runtime exception would be thrown. Example scenarios are: launching from a service, invoking an activity from a notification click. If the activity instance is already on the task list when the flag is set, it will invoke the onNewIntent() method of that Activity. All the implementation stuff goes in that method.
The `android:launchMode` of an Activity can be of the following types:
-   **standard** : It's the default launch mode for an activity wherein every new instance of the activity called will be put on top of the stack as a separate entity. Hence calling startActivity() for a particular class 10 times will create 10 activities in the task list.
-   **singleTop**: It differs from the standard launch mode in the fact that when the Activity instance that's invoked is already present on the top of the stack, instead of creating a new Activity, that instance will be called. In cases where the same Activity instance is not on the top of the stack or if it doesn't exist in the stack at all then a new instance of the activity will be added to the stack. Hence we need to handle the upcoming intent in both the `onCreate()` and `onNewIntent()` methods to cover all cases.
-   **singleTask**: This is different from singleTop in the case that if the Activity instance is present in the stack, the onNewIntent() would be invoked and that instance would be moved to the top of the stack. All the activities placed above the singleTask instance would be destroyed in this case. When the activity instance does not exist in the stack, the new instance would be placed on the top of the stack similar to the standard mode.
-   **singleInstance** : An activity with this launchMode defined would place only a singleton activity instance in the Task. The other activities of the application will be placed in a separate Task.
A taskAffinity is an attribute tag defined in the activity tag in the AndroidManifest.xml for launchMode singleInstance. Activities with similar taskAffinity values are grouped together in one task. 26) You've been given an EditText that already has some text in it. How would you place the cursor at the end of the text? The current situation and the output needed are given below. [](https://journaldev.nyc3.cdn.digitaloceanspaces.com/2016/06/edit-text-cursor-position-issue.png) [](https://journaldev.nyc3.cdn.digitaloceanspaces.com/2016/06/edit-text-cursor-position-output.png) Call the `setSelection(position)` on the EditText object with the position we need to place the cursor on. The current position is 0. To place it at the end of the current text we'll add the following code snippet in our MainActivity.
```
EditText in;
in=(EditText)findViewById(R.id.editText);
if (in != null) {
in.setSelection(Integer.parseInt(String.valueOf(in.getText().toString().length())));
}
```
The setSelection method requires an integer parameter. So we're wrapping the length of the string as an Integer using parseInt.
[](https://journaldev.nyc3.cdn.digitaloceanspaces.com/2016/06/edit-text-textwatcher.gif) We'll add the TextWatcher class to the editText object. And check for the "\\n" character and clear the editText as shown below.
```
EditText in;
in=(EditText)findViewById(R.id.editText);
in.addTextChangedListener(new TextWatcher() {
@Override
public void beforeTextChanged(CharSequence s, int start, int count, int after) {
}
@Override
public void onTextChanged(CharSequence s, int start, int before, int count) {
String string = s.toString();
if (string.length() > 0 && string.charAt(string.length() - 1) == '\n') {
Toast.makeText(getApplicationContext(),"ENTER KEY IS PRESSED",Toast.LENGTH_SHORT).show();
in.setText("");
}
}
@Override
public void afterTextChanged(Editable s) {
}
});
```
A LinearLayout arranges its children in a single row or single column one after the other. A RelativeLayout arranges it's children in positions relative to each other or relative to parent depending upon the LayoutParams defined for each view. AbsoluteLayout needs the exact positions of the x and y coordinates of the view to position it. Though this is deprecated now.
A FrameLayout stack up child views above each other with the last view added on the top. Though we can control the position of the children inside the FrameLayout using the layout\_gravity attribute. When the width and height of the FrameLayout are set to wrap\_content, the size of the FrameLayout equals the size of the largest child (plus padding). A TableLayout consists of TableRows. The children are arranged in the form of rows and columns.
Data is stored in SharedPreferences in the form of a key-value pair(HashMap). commit() was introduced in API 1 whereas apply() came up with API 9. commit() writes the data synchronously and returns a boolean value of success or failure depending on the result immediately. apply() is asynchronous and it won't return any boolean response. Also, if there is an apply() outstanding and we perform another commit(), then the commit() will be blocked until the apply() is not completed. commit() is instantaneous and performs disk writes. If we're on the main UI thread apply() should be used since it's asynchronous.
The onBackPressed() method of the Activity is invoked. Unless overridden it removes the current activity from the stack and goes to the previous activity.
The onBackPressed() method is defined as shown below:

```
    @Override
    public void onBackPressed() {
        super.onBackPressed();
    }
```

To disable the back button and preventing it from destroying the current activity and going back we have to remove the line `super.onBackPressed();`
A StateListDrawable is a drawable object defined in the XML that allows us to show a different color/background for a view for different states. Essentially it's used for Buttons to show a different look for each state(pressed, focused, selected, none).
The selector drawable for a button is shown below.
```
<selector xmlns:android="https://schemas.android.com/apk/res/android">
<item android:state_pressed="false">
<shape android:shape="rectangle">
<solid android:color="@android:color/holo_red_dark"/>
<stroke android:color="#000000" android:width="3dp"/>
<corners android:radius="2dp"/>
</shape>
</item>
<item android:state_pressed="true">
<shape android:shape="rectangle">
<solid android:color="@android:color/darker_gray"/>
<stroke android:color="#FFFF" android:width="1dp"/>
<corners android:radius="2dp"/>
</shape>
</item>
</selector>
```
We need to add this drawable XML in the android:background attribute of the button as:
```
android:background="@drawable/btn_background"
```
The output looks like this: [](https://journaldev.nyc3.cdn.digitaloceanspaces.com/2016/06/button-state-list.gif)
Fragments are a part of an activity and they contribute there own UI to the activity they are embedded in. A single activity can contain multiple fragments. Fragments are reusable across activities. The lifecycle methods of a Fragment are :
1. `onAttach(Activity)` : is called only once when it is attached with activity.
2. `onCreate(Bundle)` : it is used to initialise the fragment.
3. `onCreateView(LayoutInflater, ViewGroup, Bundle)` : creates and returns view hierarchy.
4. `onActivityCreated(Bundle)` : it is invoked after the completion of onCreate() method.
5. `onViewStateRestored(Bundle)` : it provides information to the fragment that all the saved state of fragment view hierarchy has been restored.
6. `onStart()` : makes the fragment visible.
7. `onResume()` : makes the fragment interactive.
8. `onPause()` : is called when fragment is no longer interactive.
9. `onStop()` : is called when fragment is no longer visible
10. `onDestroyView()` : it allows the fragment to clean up resources
11. `onDestroy()` : it allows the fragment to do final clean up of fragment state
12. `onDetach()` : it is called when the fragment is no longer associated with the activity
An image depicting the Fragments lifecycle is given below. [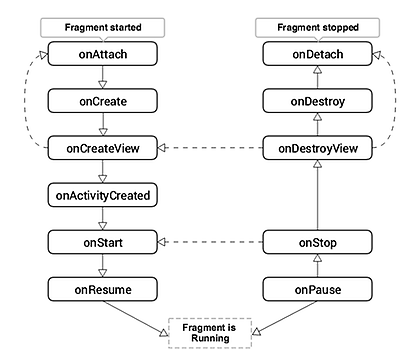](https://journaldev.nyc3.cdn.digitaloceanspaces.com/2016/07/fragment-lifecycle.png)
We'll declare and assign a class instance of the FirstActivity to itself as shown below.

```
public class FirstActivity extends AppCompatActivity {
public static FirstActivity firstActivity;

    @Override
    protected void onCreate(Bundle savedInstanceState) {
        super.onCreate(savedInstanceState);
        setContentView(R.layout.activity_main);

        firstActivity=this;
}
}
```

We'll call finish() on the above instance of the FirstActivity to kill the activity from any other activity.

```
FirstActivity.firstActivity.finish()
```
A PendingIntent is a wrapper for the Intent object. It's passed to a foreign application (NotificationManager, AlarmManager) such that when some given conditions are met, the desired action is performed on the intent object it holds onto. The foreign application performs the intent with the set of permissions defined in our application.
A Thread is generally used for long tasks to be run in the background. We need a Handler class to use a Thread. An AsyncTask is an intelligent Thread subclass. It's recommended to use AsyncTask when the caller class is the UI Thread as there is no need to manipulate the handlers. AsyncTask is generally used for small tasks that can communicate back with the main UI thread using the two methods onPreExecute() and onPostExecute() it has. A Handler class is preferred when we need to perform a background task repeatedly after every x seconds/minutes.
Given below is an AsyncTask example.
private class MyTask extends AsyncTask {
      protected String doInBackground(String... params) {

        Toast.makeText(getApplicationContext(),"Will this work?",Toast.LENGTH_LONG).show();

          int count = 100;
          int total = 0;
          for (int i = 0; i < count/2; i++) {
              total += i;
          }
          return String.valueOf(totalSize);
      }

      protected void onPostExecute(String result) {

      }
 }
We need to call the AsyncTask from the onCreate() using the following piece of code;

```
MyTask myTask= new MyTask();
myTask.execute();
```

No. The application will crash with a runtime exception since we're updating the UI Thread by trying to display a Toast message inside the doInBackground method. We need to get rid of that line to run the application successfully.
The returned value of the doInBackground goes to the onPostExecute() method. We can update the main UI thread from here. To get the returned value in the onCreate() method we need to use the following code snippet.

```
MyTask myTask= new MyTask();
String result=myTask.execute().get();
```

This approach is not recommended as it blocks the main UI thread until the value is not returned. The ideal scenario to use it is when the other views of the UI thread need the value from the AsyncTask for processing.
We need to use a Handler class in the onPostExecute that executes the AsyncTask recursively.

```
private class MyTask extends AsyncTask {
      protected String doInBackground(String... params) {

        Toast.makeText(getApplicationContext(),"Will this work?",Toast.LENGTH_LONG).show();

          int count = 100;
          int total = 0;
          for (int i = 0; i < count/2; i++) {
              total += i;
          }
          return String.valueOf(totalSize);
      }

      protected void onPostExecute(String result) {

// repeats after every 5 seconds here.
new Handler().postDelayed(new Runnable() {
        @Override
        public void run() {
            new MyAsyncTask().execute("my String");
        }
    }, 5*1000);

      }
 }
```
A service is a component in android that's used for performing tasks in the background such as playing Music, location updating etc. Unlike activities, a service does not have a UI. Also, a service can keep running in the background even if the activity is destroyed.
A service is started from an activity by executing the following code snippet.

```
startService(new Intent(this, MyService.class));
```

Though just executing the above code won't start a service. We need to register the service first in the AndroidManifest.xml file as shown below.

```
<service android:name="MyService"/>
```

To stop a service we execute `stopService()`. To stop the service from itself we call `stopSelf()`.
Services are largely divided into two categories : **Bound Services** and **Unbound/Started Services**
1.  **Bound Services**: An Android component may bind itself to a Service using `bindservice()`. A bound service would run as long as the other application components are bound to it. As soon as the components call `unbindService()`, the service destroys itself.
2.  **Unbound Services**: A service is started when a component (like activity) calls startService() method and it runs in the background indefinitely even if the original component is destroyed.
- `onStartCommand()` : This method is called when startService() is invoked. Once this method executes, the service is started and can run in the background indefinitely. This method is not needed if the service is defined as a bounded service. The service will run indefinitely in the background when this method is defined. We'll have a stop the service ourselves
- `onBind()` This method needs to be overridden when the service is defined as a bounded service. This method gets called when bindService() is invoked. In this method, we must provide an interface that clients use to communicate with the service, by returning an IBinder. We should always implement this method, but if you don’t want to allow binding, then you should return null
- `onCreate()` : This method is called while the service is first created. Here all the service initialization is done
- `onDestroy()` : The system calls this method when the service is no longer used and is being destroyed. All the resources, receivers, listeners clean up are done here
[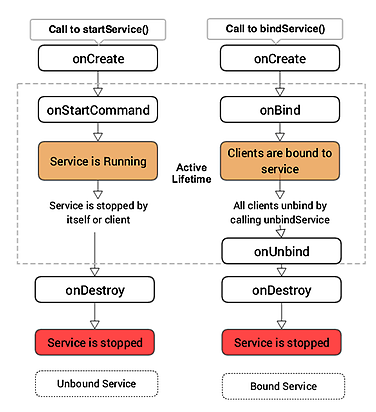](https://journaldev.nyc3.cdn.digitaloceanspaces.com/2016/07/service-lifecycle.png)
A service is used for long running tasks in the background such as playing a music or tracking and updating the user's background location. A Broadcast Receiver is a component that once registered within an application executes the onReceive() method when some system event gets triggered. The events the receiver listens to are defined in the AndroidManifest.xml in the intent filters. Types of system events that a Broadcast Receiver listens to are: changes in the network, boot completed, battery low, push notifications received etc. We can even send our own custom broadcasts using `sendBroadcast(intent)`.
The Broadcast Receiver is defined inside the receiver tags with the necessary actions defined inside the intent filter as shown below.

```
<receiver android:name=".ConnectionReceiver" >
	<intent-filter>
		<action android:name="android.net.conn.CONNECTIVITY_CHANGE" />
	</intent-filter>
</receiver>
```
-   A RecyclerView recycles and reuses cells when scrolling. This is a default behaviour. It's possible to implement the same in a ListView too but we need to implement a ViewHolder there
-   A RecyclerView decouples list from its container so we can put list items easily at run time in the different containers (linearLayout, gridLayout) by setting LayoutManager
-   Animations of RecyclerView items are decoupled and delegated to `ItemAnimator`
We need to call the method expandGroup on the adapter to keep all the group headers as expanded.

```
ExpandableListView el = (ExpandableListView) findViewById(R.id.el_main);
elv.setAdapter(adapter);
for(int i=0; i < adapter.getGroupCount(); i++)
    el.expandGroup(i);
```
The lifecycle of an AsyncTask is not tied onto the Activity since it's occurring on a background thread. Hence an orientation change won't stop the AsyncTask. But if the AsyncTask tries to update the UI thread after the orientation is changed, it would give rise to `java.lang.IllegalArgumentException: View not attached to window manager` since it will try to update the former instances of the activity that got reset.
**/assets** folder is empty by default. We can place files such as custom fonts, game data here. Also, this folder is ideal for maintaining a custom dictionary for lookup. The original file name is preserved. These files are accessible using the AssetManager (**getAssets()**). **/res/raw** folder is used to store xml files, and files like \*.mp3, \*.ogg etc. This folder gets built using aapt and the files are accessible using R.raw.
That’s all for android interview questions and answers. If I will get some more android interview questions, I will add them to the list with detailed answers later on.
Thanks for learning with the DigitalOcean Community. Check out our offerings for compute, storage, networking, and managed databases.
author


Get our biweekly newsletter
Sign up for Infrastructure as a Newsletter.

Hollie's Hub for Good
Working on improving health and education, reducing inequality, and spurring economic growth? We'd like to help.

Become a contributor
Get paid to write technical tutorials and select a tech-focused charity to receive a matching donation.

What happens when we start same service multiple times? And on which thread service runs?
- Anagha
Would you please include RXJava and Retrofit Android concepts in this Android job interview section. As you may probably know these two materials are the most important concepts in android field.
- Jay Yosi
Hi. just want to know which is better in future prospects and pay java ee spring or android development am just start learning
- harish
Feel free to ask conceptual questions related to Android. I’ll try to answer them all and probably add them to the articles itself!
- Anupam Chugh